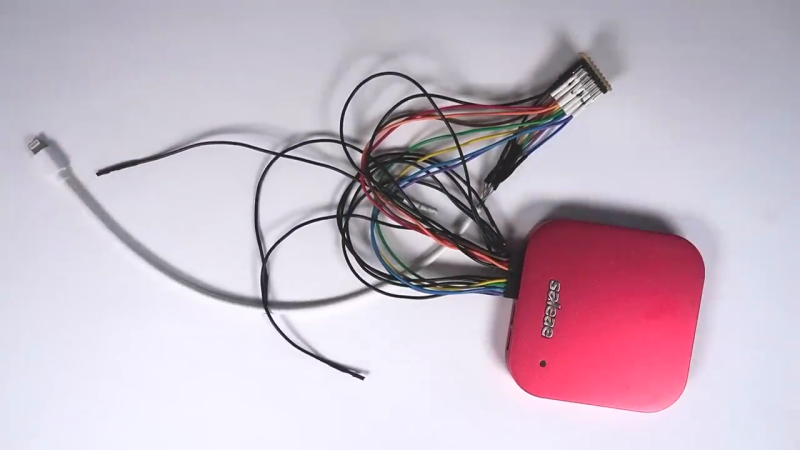
A frequent contributor to the hacker community, [stacksmashing] has prepared an excellent instructional video on reverse engineering Apple’s Lighting connector proprietary protocol. The video begins by showing how to gain physical access to the signals and hooking them up to a logic analyzer. He then notes that the handshaking uses only a single signal and proposes that Apple isn’t going to re-invent the wheel (perhaps a risky assumption). Using a ChatGPT search, obligatory these days, we learn that Dallas Semiconductor / Microchip 1-wire is probably the protocol employed.
Which embedded single-wire busses exist that encode bits with different lengths of low and high signals?
At the basic level, 1-wire and protocols like Texas Instruments SDQ operate in a similar manner. It turns out that [stacksmashing] already wrote a SDQ analyzer module for the Saleae logic analyzer. Aided by this tool, he digs deeper and learns more about the kinds of messages and their contents. For example, upon being plugged in, the host system queries the accessory’s serial number, manufacturer, model number, and product description. Finally, he introduces the CRC reverse engineering tool reveng to determine which CRC polynomial and algorithm the protocol uses to frame each packet.
Even if you have no interest in Lightning cables, this video is a great tutorial on the types of things you need to do in order to make sense of an unknown communications protocol. Gather what information you can, make some educated guesses, observe the signals, revise your guesses, and repeat. In part two, [stacksmashing] will show how to build a homemade iPhone JTAG cable.
We wrote in more detail about cracking the Lightning interface back in 2015. The Lightning interface may have been a good solution in its day, foreshadowing some of the features we now have in USB-C. But its proprietary and closed nature meant it wasn’t used outside of the Apple ecosystem. With the proliferation and capabilities of USB-C, not to mention various legislative edicts, Lightning’s days seem numbered. Is the industry finally settling on one interface? Let us know your thoughts in the comments below.
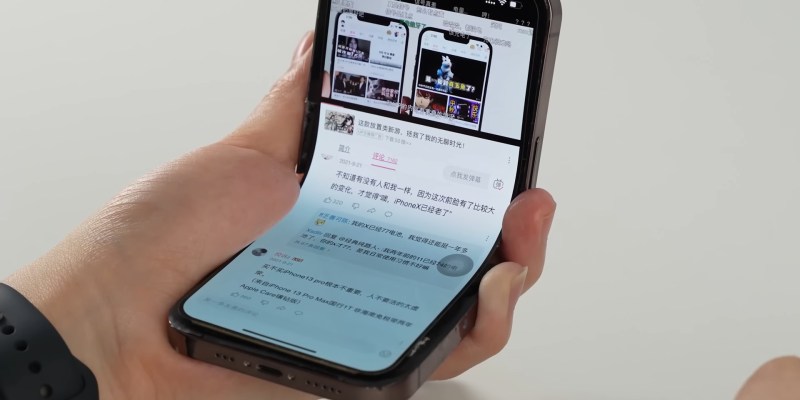
Folding phones are all the rage these days, with many of the major smartphone manufacturer’s having something in this form factor. Apple has been conspicuously absent in this market segment, so [KJMX] decided to take matters into their own hands with the “iPhone V.” (YouTube – Chinese w/subtitles via MacRumors).
Instead of trying to interface an existing folding phone’s screen with the iPhone, these makers delaminated an actual iPhone X screen to use in the mod. It took 37 attempts before they had a screen with layers that properly separated to be both flexible and functional. Several different folding phones were disassembled, and [KJMX] found a Motorola Razr folding mechanism would work best with the iPhone X screen. Unfortunately, since the iPhone screen isn’t designed to fold, it still will fail after a relatively small number of folds.
Other sacrifices were made, like the removal of the Taptic Engine and a smaller battery to fit everything into the desired form factor. The “iPhone V” boasts the worst battery life of any iPhone to date. After nearly a year of work though, [KJMX] can truly claim to have made what Apple hasn’t.
An iPhone 8, now a relatively cheap model, can charge its battery fully in two hours’ time. There’s hardly ever a need for faster charging, but it’s fair to ask – how much faster could it really go? [Scotty Allen] from [Strange Parts], back after a hiatus, is back to stretching the limits of what a regular iPhone can do, and decides to start off with an exploration of battery technologies.
What people commonly encounter is that charging speed depends on the charger involved, but even one hundred chargers in parallel won’t speed up this iPhone’s charging rate, so what’s up? First off, the phone’s charger chip and the battery’s BMS will both limit charging current, so for experiment purposes, those had to be bypassed. First attempt was using a hefty DC power supply with the original cell, and, unsatisfied with the lack of fire and still relatively slow charging, [Scotty] decides to up the ante.
There’s a few battery technologies you could pair with a phone if your aim is to speed up charging dramatically, and [Scotty] demonstrates one of them in action – for instance, Lithium-titanate batteries can take quite a pounding when it comes to charging current, and they’ve helped get the charging time down to 22 minutes. However, that’s no match for a supercapacitor pack, which the charging time down to nine minutes – a thirteenfold increase from the 90 minutes we expect. We might not hold a supercap-based iPhone anytime soon, but now, we sure have seen one.
Facing this demo, Apple ought to be ashamed of their Lightning charging ports. Perhaps, with a few hobbyist-friendly supercapacitor tricks in hand, supercapacitors will be handy for someone’s statistically inevitable project where charging time will be of major importance. Until then, we’ll probably keep focusing our efforts on building powerbanks.
What do you do with those old Android or iPhone phones and tablets? You have plenty of options, but it is pretty easy to build your own stream deck with a little off-the-shelf software. What’s a stream deck, you ask? The name comes from its use as a controller for a live-streaming setup, but essentially, it’s an LCD touchscreen that can trigger things on your computer.
The software I’m using, Deckboard, is a server for Windows or Linux and, of course, an Android app. The app is free with some limitations, but for under $4 you can buy the full version. However, even the free version is pretty capable. You can use an Android phone or tablet and you can connect to the PC with a USB cable or WiFi. I’ve found that even with WiFi, it is handy to keep the phone charged, so realistically you are going to have a cable, but it doesn’t necessarily have to connect to the host computer.
Linux Setup
Setup is very easy. The biggest hurdle is you might need to set up your firewall to allow the server to listen on port 8500 with TCP. There are a few small issues when installing with Linux that you might want to watch out for. There are 32-bit and 64-bit versions in deb, tar.gz, and appimage format. There’s also a snap. The problem with the snap is it is sandboxed, so without effort you can’t easily launch programs, which is kinda the entire point. I finally removed it and installed the deb file which was fine.
There were still two other wrinkles. First, while Deckboard offers a way to launch programs, it must be a program from a list it reads from your system. That would be acceptable, but the list wasn’t complete. I never did figure out why some things show up on the list and others don’t. For example, GIMP which shows up on my application menu was absent. Yet other things that were fairly obscure didn’t show up.
I thought this might be a dealbreaker until I found that Deckboard has a well-developed plugin system and one of those plugins lets you run an arbitrary command line. I guess it is a little less convenient, but it is much more flexible since you can launch any program you want and provide options to it as well.
The only other complaint I had is that when you run the program, it shows its configuration interface and puts itself in the system tray. That’s great the first time you run it, but on system startup, it would be nice to just have it quietly start. If there’s an option for that I haven’t found it. I’ll tell you how I solved that later, but, for now, just live with it.
Configuration
Of course, getting it installed on both machines is only the start. The whole point of something like this is to configure it to your whim. The program knows how to communicate with OBS, Spotify, Twitter, and Twitch. But you can also add generic programs, URLs, and so on. There are also plugins for things like Discord, Open Hardware Monitor, Steam, and more.
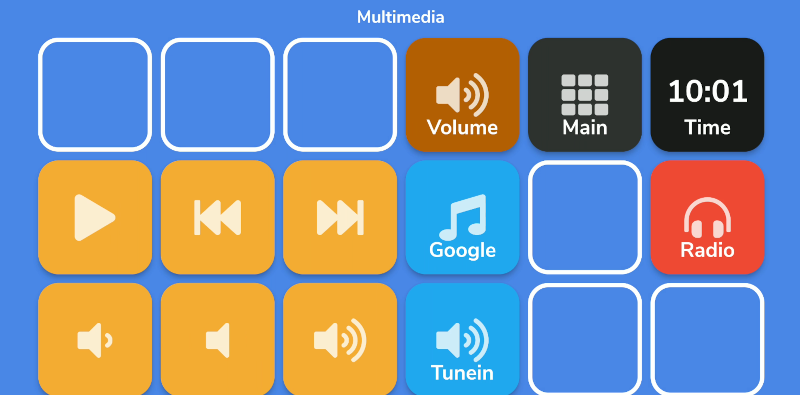
The multimedia panel lets me control media and open a few apps
You can create a bunch of pages, so you don’t have to cram everything on one page. The free version limits how many buttons you can have on a page, but the upgrade lets you put way too many if you want. I found that three rows of 6 buttons in landscape mode on my old Pixel 2 XL was about right for me.
Of course, everyone will have different ideas about how to set it up, and you are probably better able to create something aesthetic than I am. However, I tried to keep a few things constant. The top right corner of each screen is a time button that doesn’t do anything, just shows the tim). This requires a plug in. The rest of the top row is reserved for buttons that open other pages and on every screen but the main screen, the button next to the clock takes you back to main.
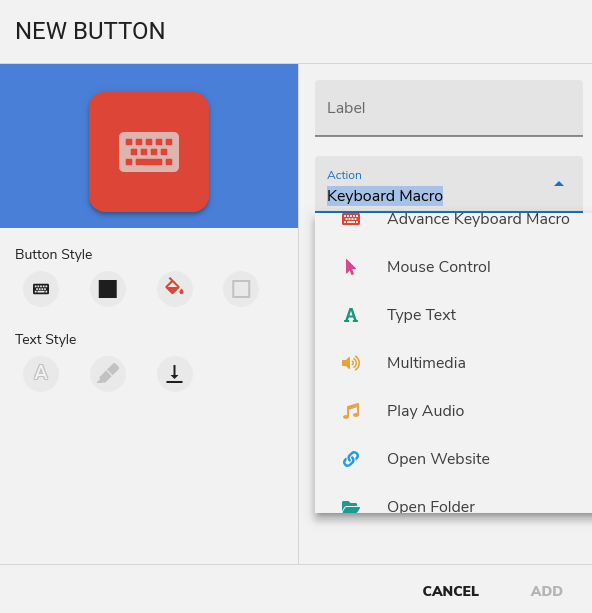
Creating a new button is easy enough
The bottom right button on each screen opens a multimedia panel because it is just so useful. Again, you won’t like my setup and will want your own.
Creating buttons and pages is very easy on the PC. You can select actions ranging from keyboard macros to multimedia control. You can control the mouse, open a website, or take a screenshot. Of course, you can also run a program as I mentioned earlier.
Form and Function
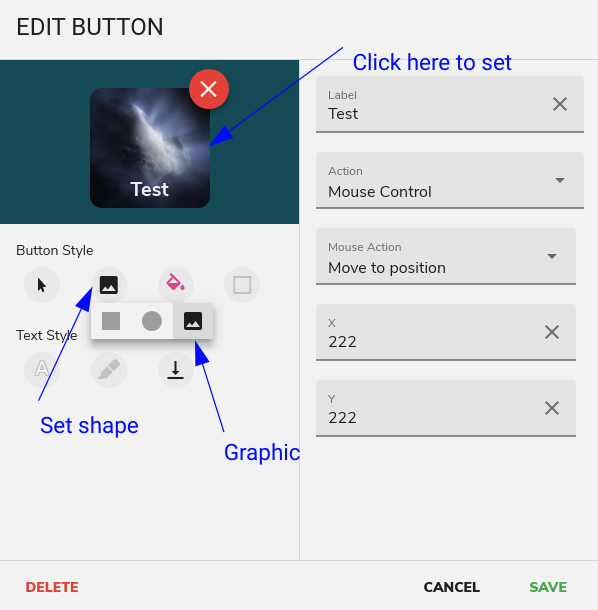
Graphic buttons can make your deck look better but getting there isn’t obvious
My buttons are a bit bland, I’ll admit. The icons are built into the program and come from Font Awesome. However, I didn’t realize that you can make each button use your own custom graphic. You do this by selecting the button’s shape which can be square, round, or a mysterious third option that looks like an image. At first, I thought that just meant “totally transparent” but if you select that and then push the button in the edit window, it lets you pick a file for a background. I guess I’ll have to go reconfigure everything now that I know that.
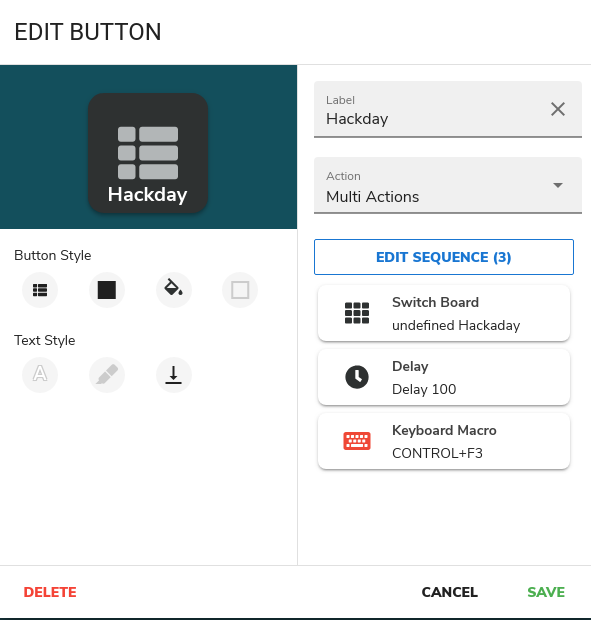
One thing that is nice is that you can have a button do multiple actions. So, for example, when I press the Hackaday button, it not only switches to the Hackaday page on the deck, it also flips over to my Hackaday desktop on the PC by sending a keyboard command. It could also run a script or folder, too.
Buttons can run more than one action
It isn’t quite a scripting language, but it prevents you from having to tie buttons to a bash script in some cases.
The Final Piece
I mentioned that I didn’t appreciate that loading the program on startup also causes the main window to appear. I found a fairly simple way to combat that, at least on KDE. First, run the program minimized. You can do that a few ways. I used a KWIN window rule to force it to iconify, but you could also use kstart to do that. Of course, if you aren’t using KDE, you’ll have to find another way to do it and, honestly, it doesn’t really matter if you don’t mind seeing the config screen pop up for a bit on startup. That’s because in addition to setting the program to autostart, I also started a script file called deckboard-tidy.sh:
#!/bin/bash
sleep 5
wmctrl -c deckboard
In other words, wait for the program to start and then close its window. It still stays running in the systemtray. You could also tell Deckboard not to load itself and then do the whole loading operation in this script. You can probably pull the same stunt on other desktops, but the details will depend on your setup.
Honestly, this is a hack that is more useful than it is difficult. But you can spend a lot of time tweaking that perfect setup. But it makes that old phone something you can use every day.
If you prefer a more rigorous hack, check out FreeDeck. Not that that’s the only one out there. If you want a really useful hack, it would be nice to reverse engineer Deckboard’s TCP protocol so we could have a Raspberry Pi server for this.
The main problem with using an iPhone as a 3D scanner in this manner is that the sensor is built into the front side of the device. It’s great for scanning your own face, but if you’re trying to scan an object, you can no longer see the iPhone’s screen. [Scott] solved this problem by slapping together a handheld 3D printed device to hold the iPhone along with an external monitor. This allowed Scott to scan while still seeing what was going on.
Having noticed that some of the 3D scanning apps produced strange, glitchy results when scanning faces, [Scott] decided to innovate artistically. He employed [Andrea] to model, took some scans, and Photoshopped the results into some impressive posters.
Overall, [Scott] demonstrates that it’s relatively easy to repurposed the iPhone for improved 3D scanning. With a simple design, he has a handheld scanner that works way better than just the phone on its own. Alternatively, consider getting into photogrammetry instead.
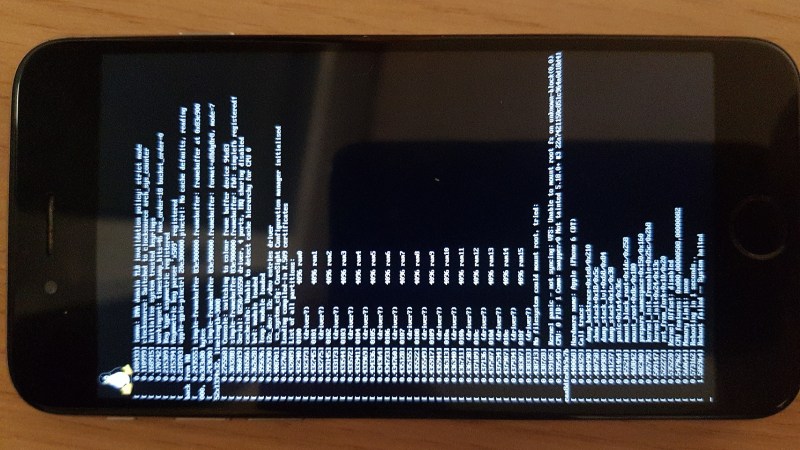
[Konrad Dybcio] tells about his journey booting Linux on A7/8/8X processors, playing around with an old iPhone 5 he’s got in a drawer. It’s been a two-year “revisit every now and then” journey, motivationally fueled by the things like Linux on M1 Macs announcement. In the end, what we have here is a way to boot mainline Linux on a few less-than-modern but still very usable iPhones, and a fun story about getting there.
[Konrad]’s work is based on the Sandcastle project research, but he couldn’t quite figure out how to make their code work, and had to make sense of it as he went. At some point, he got stuck on enabling the MMU, which was the main roadblock for a while. Joined by another developer intrigued by Apple hardware, they were hacking away at it, developing tools and neat tricks on their way, but to no avail. With the framebuffer accessible and no other decent debugging methods in sight, he tells about a code snippet they wrote that printed register values as valid barcodes
Then, looking deeper into the known-working code, he realized that there was a single line difference in how they loaded the Linux image. Fixing that, they got the MMU to enable! From here, the Linux hacking part ensued, and still continues, with other people pulling their old iDevices out of their respective drawers and joining in on the fun. Integration work is ongoing, with basic peripherals being brought up. Some of the peripherals, we might not see working anytime soon, but from here, it should be way easier to develop drivers and conquer these devices one-by-one.
This development should work for iPhone 5S, 6 and 6 Plus, iPod touch 6th gen, as well as iPad Air 1/2 and iPad Mini 2/3/4. Would you like to boot Linux on one of these devices in your posession? [Konrad] shares instructions on how to get your device from zero to a Linux bootlog on the screen; assistance is available but Linux experience is desired! If you do decide to play around with your own old iDevice, you should spend a minute or two helping him along the way – he is collecting ADT files from different iDevices, and instructions for providing one are super simple!
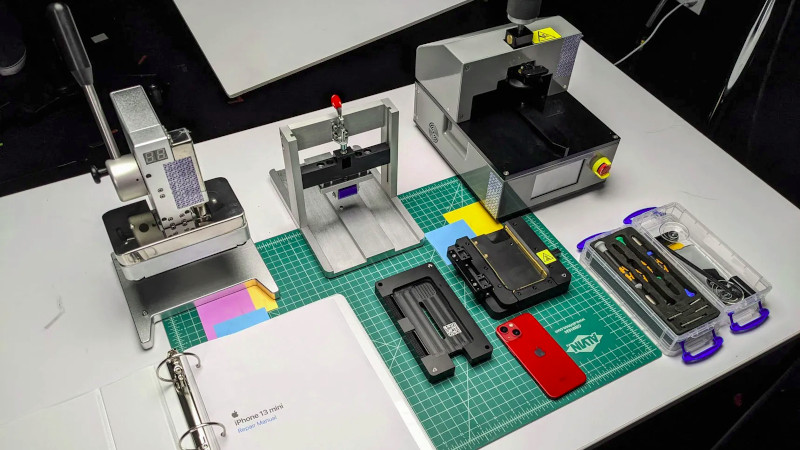
It’s been a frequent criticism of Apple, that their products are difficult to repair. They’ve hit back with a self-repair program for iPhones, and should you wish to take advantage of it they will hire you a tool kit. Not the iFixit box you might expect, instead they give you two hefty suitcases that contain 36 Kg of tools and equipment. Yes, you can repair an iPhone, but they ensure that it’s not for the faint-hearted.
In the kit is an impressive array of everything you might need for your iDevice, including the proper heat plate and press for the job. None of that messing about with a hot air gun for your $49 rental cost and $1200 if you don’t return the tools, but it remains an impossibly difficult and expensive process for all but the most dedicated of Apple fanboy technicians.
The sense from the Verge article is that Apple have had their arm twisted to the extent that they must provide a repair option, but they’ve gone to extravagant lengths to make it something nobody in their right mind would pursue. There’s an attraction in the idea of playing with a fully-equipped Apple repair kit for a few days, but maybe it’s not worth the cost.
With everything being “connected” these days smartphone applications are of course a ubiquitous part of our existence. We’ve seen plenty of examples connecting your Bluetooth-enabled projects to an Android device, but comparatively fewer tutorials for connecting to iOS devices. This mostly has to do with Android’s much larger market share and also Android’s more open-source friendly business model. Nevertheless, if you do much IoT development either as a hobby or professionally, then you probably find yourself interacting with Apple devices more than you like to admit.
[Akio’s] app is essentially updating a chart, in real-time, with data read from an Adafruit nRF52832 Feather board. He then walks you through all the basics of creating a user interface (UI) using Apple’s Storyboard interface, a simple drag-and-drop scheme similar to something you’ve probably used in many other contexts. [Akio] shows readers how to add buttons for allowing users to interact with the app, labels for displaying data to the user, as well as walks you through Apple’s odd methodology of connecting UI elements to code using IBAction and IBOutlets. The highlight of his tutorial is showing readers how to add charts to their iOS apps which seems to take a few more steps than you might imagine.
[Akio] does a really good job detailing all the relevant functions so that readers will hopefully understand what each piece of the code is doing. And we really enjoyed him adding individual video tutorials for some of the trickier programming steps. He also readily admits that some folks may opt to develop their UI exclusively in code as opposed to the Storyboard but he argues that the Storyboard is still important for beginners and is really handy when the UI is fairly simple.
Of course, in true open-source fashion, [Akio] provides all his code on his GitHub repository so you can clone the repo and run the code yourself as well as credit some of the resources he used while making his app. Two things we really love to see. Hopefully, [Akio’s] tutorial will make connecting to iOS devices seem much less onerous than it once was.
Electronic devices can be surprisingly leaky, often spraying out information for anyone close by to receive. [Docter Cube] has found another such leak, this time with the speakers in iPhones. While repairing an old AM radio and listening to a podcast on his iPhone, he discovered that the radio was receiving audio the from his iPhone when tuned to 950-970kHz.
[Docter Cube] states that he was able to receive the audio signal up to 20 feet away. A number of people responded to the tweet with video and test results from different phones. It appears that iPhones 7 to 10 are affected, and there is at least one report for a Motorola Android phone. The amplifier circuit of the speaker appears to be the most likely culprit, with some reports saying that the volume setting had a big impact. With the short range the security risk should be minor, although we would be interested to see the results of testing with higher gain antennas. It is also likely that the emission levels still fall within FCC Part 15 limits.
I've confirmed this on an 8 non-pro AND discovered that when you're around 960 KHz you ALSO can detect the haptic clicks! I am suspecting that they are running a class D amp with the PWM at 960 KHz, which would be 20x 48khz-right on the mark for a class D amp. Video demo of both. pic.twitter.com/EbodZS11kB
The phenomenon of electronics leaking unintended information in magnetic waves has been knows since WW2, and it even has a codename, TEMPEST. If you want to learn more about it and do some experimentation, there are a number of open source software toolkits you can play with.
Every tech monopoly has their own proprietary smart home standard; how better to lock in your customers than to literally build a particular solution into their homes? Among the these players Apple is traditionally regarded as the most secretive, a title it has earned with decades of closed standards and proprietary solutions. This reputation is becoming progressively less deserved when it comes to HomeKit, their smart home gadget connectivity solution. In 2017 they took a big step forward and removed the need for a separate authentication chip in order to interact with HomeKit. Last week they took another and released a big chunk of their HomeKit Accessory Development Kit (ADK) as well. If you’re surprised not to have heard sooner, that might be because it was combined the the even bigger news about Apple, Amazon, the Zigbee Alliance, and more working together on more open, interoperable home IoT standards. Check back in 2030 to see how that is shaping up.
“The HomeKit ADK implements key components of the HomeKit Accessory Protocol (HAP), which embodies the core principles Apple brings to smart home technology: security, privacy, and reliability.”
– A descriptive gem from the README
Despite many breathless mentions in the press release it’s hard to tell what the ADK actually is. The README and documentation directory are devoid of answers, but spelunking through the rest of the GitHub repo gives us an idea. It consists of two primary parts, the HomeKit Accessory Protocol itself and the Platform Abstraction Layer. Together the HAP implements HomeKit itself, and the PAL is the wrapper that lets you plug it into a new system. It’s quite a meaty piece of software; the HAP’s main header is a grueling 4500 lines long, and it doesn’t take much searching to find some fear-inspiring 50 line preprocessor macros. This is a great start, but frankly we think it will take significantly more documentation to make the ADK accessible to all.
If it wasn’t obvious, most of the tools above are carefully licensed by Apple and intended for non-commercial use. While we absolutely appreciate the chance to get our hands on interfaces like this, we’re sure many will quibble over if this really counts as “open source” or not (it’s licensed as Apache 2.0). We’ll leave that for you in the comments.
Apple is known for a lot of things, but opening up their platforms to the world isn’t one of those things. According to a recent Google post by [Brandon Azad], there do exist special iPhones that are made for development with JTAG ports and other magic capabilities. The port is in all iPhones (though unpopulated), but is locked down by default. We don’t know what it takes to get a magic iPhone, but we are guessing Google can’t send in the box tops to three Macbook Pros to get on the waiting list. But what is locked can be unlocked, and [Brandon] set out to build a debuggable iPhone.
Exploiting some debug registers, it is possible to debug the A11 CPU at any point in its execution. [Brandon’s] tool single steps the system reset and makes some modifications to the CPU after key instructions to prevent the lockdown of kernel memory. After that, the world’s your oyster. KTRW is a tool built using this technique that can debug an iPhone with a standard cable.
The name is a play on KTRR which is the Kernel Text Readonly Region. The work follows the example of some earlier exploits that did similar things. Those methods, though, didn’t have the flexibility that KTRW offers.
Honestly, we don’t really care about debugging the iPhone but the cat and mouse story of how to work around all the Apple protection is a pretty good read. Of course, it really is cat and mouse. KTRW doesn’t work on A12 devices. Curiously, [Brandon] thinks other people already knew this or similar methods to compromise the phone, but didn’t publish it to discourage Apple closing the door that lets them in.
Apple phones have a reputation as being safe, but they do get hacked. And if you want to just disable some of them, you only need a kid’s balloon.
Apple has for a very long time been a company that ploughs its own furrow when it comes to peripherals, with expensive proprietary hardware being the order of the day over successive generations of its products. One of its current line of proprietary interfaces is the Lightning connector, best thought of as an Apple-only take on the same ideas that the rest of the world knows as USB-C. There are a whole host of white dangly peripherals that can be hung from your iDevice’s Lightning port, including a pair of display adaptors that allow them to drive an HDMI or VGA monitor. [Lisa Braun] has subjected one that had failed to a teardown, and her analysis gives some insight into the way Apple creates its peripherals.
Where you might expect these to contain mostly the equivalent of a graphics card, in fact they have a fully-fledged SoC of their own that runs its own OS with the same Darwin kernel as its host. Unexpectedly this is not held upon the adapter itself, instead it is shipped with iOS and loaded dynamically. Thus the file containing it can be retrieved from iOS and unpacked, leading to some interesting analysis. In a fascinating twist for those of us unused to Lightning’s internals, it’s revealed that the device can be driven from a USB port with the appropriate cobbled-together adapter, allowing a full-size MacOS device to interrogate it. This many not be news to readers with a long memory though, we’ve told you in the past about reverse engineering the Lightning connector.
The origin story of software takes us back past punch card computers and Babbage’s Difference Engine to a French weaver called Joseph Marie Jacquard. Jacquard created a way to automate mechanical looms, giving weavers the ability to change a loom’s pattern by simply switching punch cards. This invention not only made it possible to produce detailed fabrics in a vastly simplified way, it was an extremely important conceptual step in the development of computer programming, influencing Babbage’s development of the Analytical Engine amongst many other things.
So, when [Kurt] saw his son’s enthusiasm for weaving on a simple loom, he started thinking about how he could pay homage to the roots of software by designing and building an open source computer controlled loom. He knew this was going to be difficult: looms are complex machines with hundreds of small parts. [Kurt] wrestled with wonky carriage movements, cam jams, hook size disasters and plenty of magic smoke from motor control boards. After a year and a half of loom hacking he succeeded in making a 60 thread computer controlled loom, driven by an iPhone app using Bluetooth.
As well as writing up the story of this build on his blog, linked above, [Kurt] has also has made all of his design files, PCB layouts, firmware and code available on GitLab.
While earlier smartphones seemed to manage well enough with individual applications that only weighed in at a few megabytes, a perusal of the modern smartphone software store uncovers some positively monstrous file sizes. The fact that we’ve become accustomed to mobile applications requiring 100+ MB downloads on what’s often a metered Internet connection in only a few short years is pretty crazy if you stop to think about it.
Seeing reports that the Nest app for iOS tipped the scales at nearly 250 MB, [Alexandre Colucci] decided to investigate. On his blog he not only documents the process of taking the application apart piece by piece to find out just what’s eating up all that space, but lists some potential fixes which could shave a bit off the top. Even if you aren’t planning a spelunking expedition into your pocket supercomputer’s particular variant of the Netflix app, the methodology and tools he uses here are fascinating in their own right and might be something worth adding to your software bag of tricks.
By passing the application’s files through a disk usage visualizer called GrandPerspective, [Alexandre] immediately identified some rather large blocks of content. The bundled Apple Watch version of the app takes up 23 MB, video and audio used to walk the user through the device setup weigh in at 22 MB, and localization files for various languages consumes a surprising 33 MB. But the biggest single contributor to the application’s heft is the assorted libraries and frameworks which total up to an incredible 67 MB.
Of course the question is, how much of it is really necessary? It’s hard to be sure from an outsider’s perspective, but [Alexandre] notes that a few of the libraries used seem to be redundant or obsolete. In some cases this could be the result of old code still lurking in the project, but the four different libraries used for user tracking probably aren’t in there by accident. It also stands to reason that the instructional videos could be offloaded to something like YouTube, so that only users who need to view them have to expend their bandwidth on it.
Getting a little deeper into things, [Alexandre] notes that some of the localization images appear to be redundant. As a specific example, he points to the images of the Nest itself displaying Fahrenheit and Celsius temperatures. While logically this should only be two image files, there are actually eight copies of the Celsius image, each filed away as language-specific. These redundant localization images could easily be stripped out, but with gains measured in only a few hundred kilobytes, it probably wasn’t considered worth the effort during development.
In the end there’s really not as much bloat as we might like to believe. There were some redundant files, maybe a few questionable library inclusions, and the Apple Watch version of the app could surely be separated out. All together, it might get you a savings of 30 – 40%, but still not enough to bring it down under 100 MB.
Why in the world does helium kill iPhones and other members of the Apple ecosystem? Enquiring minds want to know, and [Ben Krasnow] has obliged with an investigation of the culprit: the MEMS oscillator. (YouTube, embedded below.)
When we first heard about this, courtesy in part via a Hackaday post on MRI-killed iPhones, we couldn’t imagine how poisoning a micro-electromechanical system (MEMS) part could kill a phone. We’d always associated MEMS with accelerometers and gyros, important sensors in the smartphone suite, but hardly essential. It turns out there’s another MEMS component in many Apple products: an SiT 1532 oscillator, a tiny replacement for quartz crystal oscillators.
[Ben] got a few from DigiKey and put them through some tests in a DIY gas chamber. He found that a partial pressure of helium as low as 2 kPa, or just 2% of atmospheric pressure, can kill the oscillator. To understand why, and because [Ben] has a scanning electron microscope, he lapped down some spare MEMS oscillators to expose their intricate innards. His SEM images are stunning but perplexing, raising questions about how such things could be made which he also addresses.
The bottom line: helium poisons MEMS oscillators in low enough concentrations that the original MRI story is plausible. As a bonus, we now understand MEMS devices a bit better, and have one more reason never to own an iPhone.
Sometimes hacking isn’t as much about building something, it’s about getting to the root of a particularly difficult problem. [Erik Wooldrige] was facing a problem like that. He’s a system specialist at a hospital near Chicago. Suddenly a bunch of iPhones and Apple watches were failing or glitching. The only thing anyone could think of was the recent install of an MRI machine.
Sure, an MRI machine can put out some serious electromagnetic pulses, but why would that only affect Apple products? Everything else in the hospital, including Android phones, seemed to be OK. But about 40 Apple devices were either dead or misbehaving.
It took some detective work, but they think they know what was the cause. The MRI machine uses liquid helium to cool its powerful magnets. Turns out the helium had leaked and over 5 hours about 120 liters of liquid helium vented into the air. Helium is notoriously hard to contain because, like hydrogen, it is a tiny little atom even by atomic standards. It also expands about 750 times when it turns into a gas, according to the post’s analysis.
Gathering more data, they found that many of the phones would eventually recover and that all the devices were at least an iPhone 6 or an Apple Watch. So even older iPhones seemed to be immune. Some speculated that the helium is small enough to get into the MEMS devices like the accelerometer or gyroscope that is in most modern phones and affect its operation. But why would that effectively brick phones? And why wouldn’t that affect most phones Android or otherwise?
The best theory — and it seems plausible to us — is that Apple stopped using quartz crystals for the phone’s internal clocks. Instead, they are using MEMS oscillators from a company called SiTime. Supposedly the MEMS oscillators are smaller and work better at temperature extremes. If the mechanical clock element got gummed up with helium, that would explain all the observed evidence.
[Erik Wooldrige] reading about the issue on Reddit, did an experiment where he subjected an iPhone to helium in a plastic bag. Granted, this is a lot more concentration of helium than the hospital probably got. but they also had five hours of exposure. In the video, below, you can see Erik’s phone stopped keeping time just after the three-minute mark on the video, eight and a half minutes of exposure.
It turns out if you read the iPhone user’s guide it reportedly says:
“Exposing iPhone to environments having high concentrations of industrial chemicals, including near evaporating liquified gasses such as helium, may damage or impair iPhone functionality. … If your device has been affected and shows signs of not powering on, the device can typically be recovered. Leave the unit unconnected from a charging cable and let it air out for approximately one week. The helium must fully dissipate from the device, and the device battery should fully discharge in the process. After a week, plug your device directly into a power adapter and let it charge for up to one hour. Then the device can be turned on again.”
Apparently, SiTime also is aware of this problem and says its newer devices are “impervious to all small-molecule gasses.” But they admit older parts were not immune.
Unless you spend a lot of time blowing up balloon animals, this probably won’t affect you. Still, we thought it was an interesting piece of detective work and one of those things that you might remember in a few years when you have some wacky failure in your blimp fleet. Of course, we were supposed to be running out of helium, so if that were true, this problem would eventually take care of itself.
Part of the joy of hacking is the joy of discovery, of seeing how things go right as well as wrong. That’s one cool thing about this iPad Mini 2 case build by [Eric Strebel]: in the video, he details the things that went wrong as well as those that went right. For instance, he used glue on one version that melted the foam core he built the iPad holder from. The end product is wonderful, though. It combines an iPad Mini 2 case and a spiral-bound notebook so you can use both digital and paper mediums, with the iPad cleverly hidden behind a panel that both protects it and turns the screen off when not in use.
The case is made from a Pentalic 7 x 10 wire-bound sketchbook, with some of the pages removed. These are replaced by an iPad holder made from foam core and matte board, which should protect the iPad from drops and knocks. A notch at the bottom allows for a charging cable, and an additional notch at the top lets you lift out the iPad if needed.
It’s a great, clean build that looks as good as a commercial case, and is more practical. I love the idea of combining an iPad with a sketchbook with removable paper pages: sometimes, you just need that feel of pen or pencil on paper to work. My only suggestion for improvement might be a couple more indentations at the bottom of the iPad holder to allow the sound to escape from the speakers a little better.
We could watch cellphone teardown videos all day long. There’s something pleasing about seeing how everything is packed into such a small enclosure. From the connectors, to that insidious glue, to the minuscule screws, [Scotty Allen] has a real knack for giving us a great look at the teardown process. Take a look at his latest video which attempts to add wireless charging to an iPhone. I think there’s a lot to be said for superb lighting and a formidable camera, but part of this is framing the shots just right.
Now of course we’ve taken apart our fair share of phones and there’s always that queasy “I think I’m going to break something” feeling while doing it. It’s reassuring that [Scotty] isn’t able to do things perfectly either (although he has the benefit of walking the markets for quick replacement parts). This video is a pretty honest recounting of many things going wrong.
The iPhone 6 and 7 are not meant to have wireless charging, but [Scotty’s] working with a friend named [Yeke] who created an aftermarket kit for this. The flexible PCB needs to be folded just right, and adhesive foam added (along with a magical incantation) to make it work. That’s because the add-on is a no-solder job. Above you can see it cleverly encircles one of the mating connectors and relies on mechanical pressure to make contact with the legs of that connector. Neat!
In the second half of the video [Scotty] meets up with [Yeke] to discuss the design itself. We find it interesting that [Yeke] considers his work a DIY item. Perhaps it’s merely lost in translation, but perhaps [Yeke’s] proximity to multiple flexible PCB manufacturers makes him feel that this is more like playing around for fun than product design. Any way you look at it, the ability to design something that will fit inside that crazy-tight iPhone case is both impressive and mesmerizing. Having seen some of the inductive charging hacks over the years, this is by far the cleanest way to go about it.
While Apple products have their upsides, the major downside with them is their closed environment. Most of the products are difficult to upgrade, to say the least, and this is especially true with the iPhone. While some Android devices still have removable storage and replaceable batteries, this has never been an option for any of Apple’s phones. But that doesn’t mean that upgrading the memory inside the phone is completely impossible.
[Scotty] from [Strange Parts] is no stranger to the iPhone, and had heard that there are some shops that can remove the storage chip in the iPhone and replace it with a larger one so he set out on a journey to try this himself. The first step was to program the new chip, since they must have software on them before they’re put in the phone. The chip programmer ironically doesn’t have support for Mac, so [Scotty] had to go to the store to buy a Windows computer first before he could get the chip programmer working right.
After that hurdle, [Scotty] found a bunch of old logic boards from iPhones to perfect his desoldering and resoldering skills. Since this isn’t through-hole technology a lot of practice was needed to desolder the chip from the logic board without damaging any of the other components, then re-ball the solder on the logic board, and then re-soldering the new larger storage chip to the logic board. After some hiccups and a lot of time practicing, [Scotty] finally had an iPhone that he upgraded from 16 GB to 128 GB.
[Scotty] knows his way around the iPhone and has some other videos about other modifications he’s made to his personal phone. His videos are very informative, in-depth, and professionally done so they’re worth a watch even if you don’t plan on trying this upgrade yourself. Not all upgrades to Apple products are difficult and expensive, though. There is one that costs only a dollar.
We sat down with him after his talk at the Hackaday Superconference last November, and we have to say that he made us think more than twice about tackling the tiny computer that lies hidden inside a cell phone. Check out his talk if you haven’t yet.
When project inspiration strikes, we’d love to do some quick tests immediately to investigate feasibility. Sadly we’re usually far from our workbench and its collection of sensor modules. This is especially frustrating when the desired sensor is in the smartphone we’re holding, standing near whatever triggered the inspiration. We could download a compass app, or a bubble level app, or something similar to glimpse sensor activity. But if we’re going to download an app, consider Google’s Science Journal app.
It was designed to be an educational resource, turning a smartphone’s sensor array into a pocket laboratory instrument and notebook for students. Fortunately it will work just as well for makers experimenting with project ideas. The exact list of sensors will depend on the specific iOS/Android device, but we can select a sensor and see its output graphed in real-time. This graph can also be recorded into the journal for later analysis.
Science Journal was recently given a promotional push by the band OK Go, as part of their OK Go Sandbox project encouraging students to explore, experiment, and learn. This is right up the alley for OK Go, who has a track record of making music videos that score high on maker appeal. Fans would enjoy their videos explaining behind-the-scene details in the context of math, science, and music.
While the Science Journal app has provisions for add-on external sensors, carrying them around would reduce its handy always-available appeal. Not that we’re against pairing smartphones with clever accessories to boost their sensing capabilities: we love them! From trying to turn a smartphone into a Tricorder, to an inexpensive microscope, to exploring serious medical diagnosis, our pocket computers can do it all.

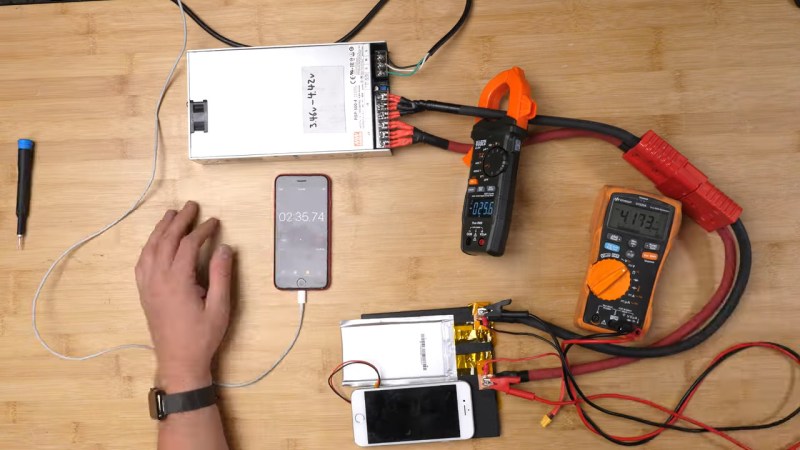
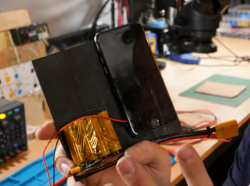 What people commonly encounter is that charging speed depends on the charger involved, but even one hundred chargers in parallel won’t speed up this iPhone’s charging rate, so what’s up? First off, the phone’s charger chip and the battery’s BMS will both limit charging current, so for experiment purposes, those had to be bypassed. First attempt was using a hefty DC power supply with the original cell, and, unsatisfied with the lack of fire and still relatively slow charging, [Scotty] decides to up the ante.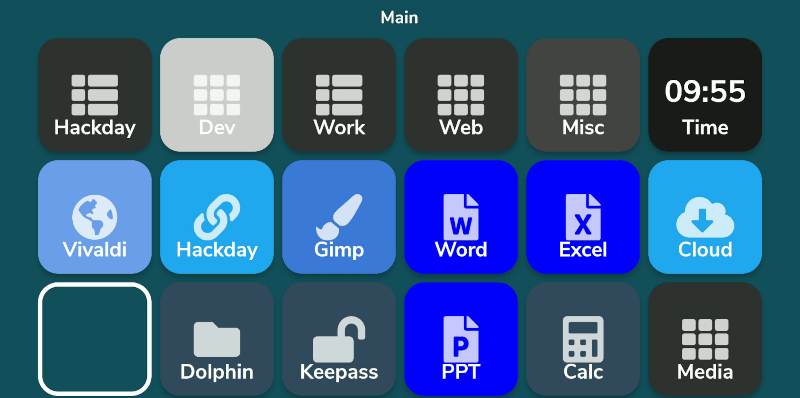


 (@konradybcio)