A frequent contributor to the hacker community, [stacksmashing] has prepared an excellent instructional video on reverse engineering Apple’s Lighting connector proprietary protocol. The video begins by showing how to gain physical access to the signals and hooking them up to a logic analyzer. He then notes that the handshaking uses only a single signal and proposes that Apple isn’t going to re-invent the wheel (perhaps a risky assumption). Using a ChatGPT search, obligatory these days, we learn that Dallas Semiconductor / Microchip 1-wire is probably the protocol employed.
Which embedded single-wire busses exist that encode bits with different lengths of low and high signals?
At the basic level, 1-wire and protocols like Texas Instruments SDQ operate in a similar manner. It turns out that [stacksmashing] already wrote a SDQ analyzer module for the Saleae logic analyzer. Aided by this tool, he digs deeper and learns more about the kinds of messages and their contents. For example, upon being plugged in, the host system queries the accessory’s serial number, manufacturer, model number, and product description. Finally, he introduces the CRC reverse engineering tool reveng to determine which CRC polynomial and algorithm the protocol uses to frame each packet.
Even if you have no interest in Lightning cables, this video is a great tutorial on the types of things you need to do in order to make sense of an unknown communications protocol. Gather what information you can, make some educated guesses, observe the signals, revise your guesses, and repeat. In part two, [stacksmashing] will show how to build a homemade iPhone JTAG cable.
We wrote in more detail about cracking the Lightning interface back in 2015. The Lightning interface may have been a good solution in its day, foreshadowing some of the features we now have in USB-C. But its proprietary and closed nature meant it wasn’t used outside of the Apple ecosystem. With the proliferation and capabilities of USB-C, not to mention various legislative edicts, Lightning’s days seem numbered. Is the industry finally settling on one interface? Let us know your thoughts in the comments below.
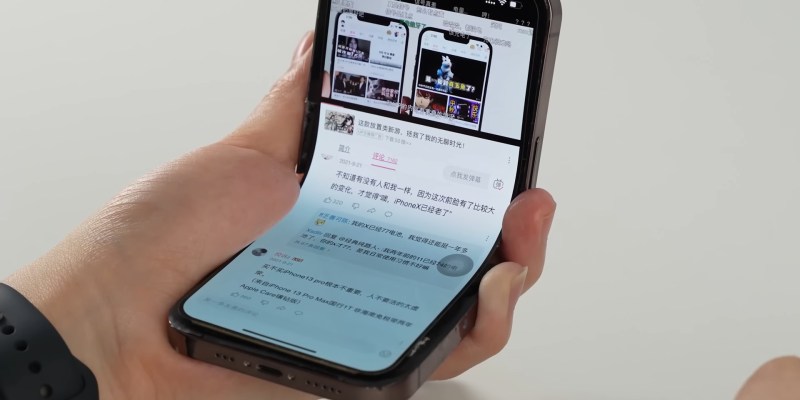
Folding phones are all the rage these days, with many of the major smartphone manufacturer’s having something in this form factor. Apple has been conspicuously absent in this market segment, so [KJMX] decided to take matters into their own hands with the “iPhone V.” (YouTube – Chinese w/subtitles via MacRumors).
Instead of trying to interface an existing folding phone’s screen with the iPhone, these makers delaminated an actual iPhone X screen to use in the mod. It took 37 attempts before they had a screen with layers that properly separated to be both flexible and functional. Several different folding phones were disassembled, and [KJMX] found a Motorola Razr folding mechanism would work best with the iPhone X screen. Unfortunately, since the iPhone screen isn’t designed to fold, it still will fail after a relatively small number of folds.
Other sacrifices were made, like the removal of the Taptic Engine and a smaller battery to fit everything into the desired form factor. The “iPhone V” boasts the worst battery life of any iPhone to date. After nearly a year of work though, [KJMX] can truly claim to have made what Apple hasn’t.
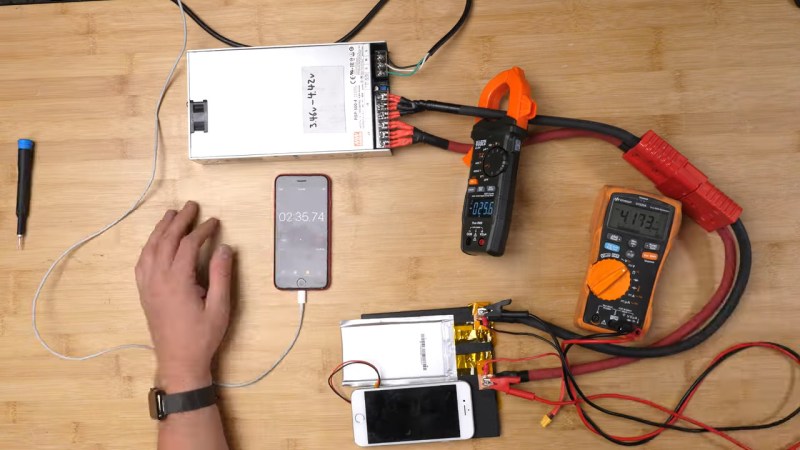
An iPhone 8, now a relatively cheap model, can charge its battery fully in two hours’ time. There’s hardly ever a need for faster charging, but it’s fair to ask – how much faster could it really go? [Scotty Allen] from [Strange Parts], back after a hiatus, is back to stretching the limits of what a regular iPhone can do, and decides to start off with an exploration of battery technologies.
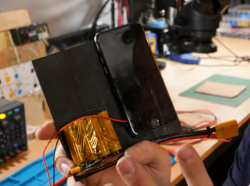
What people commonly encounter is that charging speed depends on the charger involved, but even one hundred chargers in parallel won’t speed up this iPhone’s charging rate, so what’s up? First off, the phone’s charger chip and the battery’s BMS will both limit charging current, so for experiment purposes, those had to be bypassed. First attempt was using a hefty DC power supply with the original cell, and, unsatisfied with the lack of fire and still relatively slow charging, [Scotty] decides to up the ante.
There’s a few battery technologies you could pair with a phone if your aim is to speed up charging dramatically, and [Scotty] demonstrates one of them in action – for instance, Lithium-titanate batteries can take quite a pounding when it comes to charging current, and they’ve helped get the charging time down to 22 minutes. However, that’s no match for a supercapacitor pack, which the charging time down to nine minutes – a thirteenfold increase from the 90 minutes we expect. We might not hold a supercap-based iPhone anytime soon, but now, we sure have seen one.
Facing this demo, Apple ought to be ashamed of their Lightning charging ports. Perhaps, with a few hobbyist-friendly supercapacitor tricks in hand, supercapacitors will be handy for someone’s statistically inevitable project where charging time will be of major importance. Until then, we’ll probably keep focusing our efforts on building powerbanks.
What do you do with those old Android or iPhone phones and tablets? You have plenty of options, but it is pretty easy to build your own stream deck with a little off-the-shelf software. What’s a stream deck, you ask? The name comes from its use as a controller for a live-streaming setup, but essentially, it’s an LCD touchscreen that can trigger things on your computer.
The software I’m using, Deckboard, is a server for Windows or Linux and, of course, an Android app. The app is free with some limitations, but for under $4 you can buy the full version. However, even the free version is pretty capable. You can use an Android phone or tablet and you can connect to the PC with a USB cable or WiFi. I’ve found that even with WiFi, it is handy to keep the phone charged, so realistically you are going to have a cable, but it doesn’t necessarily have to connect to the host computer.
Linux Setup
Setup is very easy. The biggest hurdle is you might need to set up your firewall to allow the server to listen on port 8500 with TCP. There are a few small issues when installing with Linux that you might want to watch out for. There are 32-bit and 64-bit versions in deb, tar.gz, and appimage format. There’s also a snap. The problem with the snap is it is sandboxed, so without effort you can’t easily launch programs, which is kinda the entire point. I finally removed it and installed the deb file which was fine.
There were still two other wrinkles. First, while Deckboard offers a way to launch programs, it must be a program from a list it reads from your system. That would be acceptable, but the list wasn’t complete. I never did figure out why some things show up on the list and others don’t. For example, GIMP which shows up on my application menu was absent. Yet other things that were fairly obscure didn’t show up.
I thought this might be a dealbreaker until I found that Deckboard has a well-developed plugin system and one of those plugins lets you run an arbitrary command line. I guess it is a little less convenient, but it is much more flexible since you can launch any program you want and provide options to it as well.
The only other complaint I had is that when you run the program, it shows its configuration interface and puts itself in the system tray. That’s great the first time you run it, but on system startup, it would be nice to just have it quietly start. If there’s an option for that I haven’t found it. I’ll tell you how I solved that later, but, for now, just live with it.
Configuration
Of course, getting it installed on both machines is only the start. The whole point of something like this is to configure it to your whim. The program knows how to communicate with OBS, Spotify, Twitter, and Twitch. But you can also add generic programs, URLs, and so on. There are also plugins for things like Discord, Open Hardware Monitor, Steam, and more.
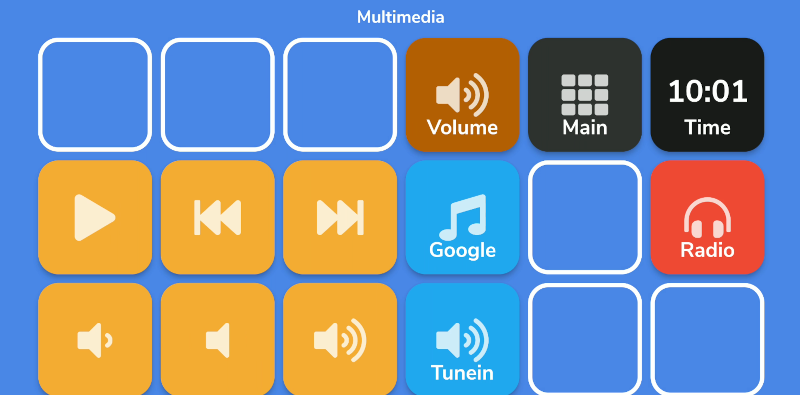
The multimedia panel lets me control media and open a few apps
You can create a bunch of pages, so you don’t have to cram everything on one page. The free version limits how many buttons you can have on a page, but the upgrade lets you put way too many if you want. I found that three rows of 6 buttons in landscape mode on my old Pixel 2 XL was about right for me.
Of course, everyone will have different ideas about how to set it up, and you are probably better able to create something aesthetic than I am. However, I tried to keep a few things constant. The top right corner of each screen is a time button that doesn’t do anything, just shows the tim). This requires a plug in. The rest of the top row is reserved for buttons that open other pages and on every screen but the main screen, the button next to the clock takes you back to main.
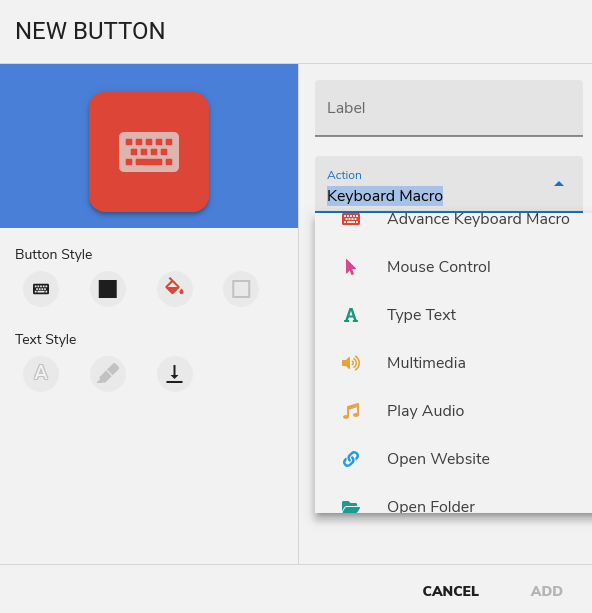
Creating a new button is easy enough
The bottom right button on each screen opens a multimedia panel because it is just so useful. Again, you won’t like my setup and will want your own.
Creating buttons and pages is very easy on the PC. You can select actions ranging from keyboard macros to multimedia control. You can control the mouse, open a website, or take a screenshot. Of course, you can also run a program as I mentioned earlier.
Form and Function
Graphic buttons can make your deck look better but getting there isn’t obvious
My buttons are a bit bland, I’ll admit. The icons are built into the program and come from Font Awesome. However, I didn’t realize that you can make each button use your own custom graphic. You do this by selecting the button’s shape which can be square, round, or a mysterious third option that looks like an image. At first, I thought that just meant “totally transparent” but if you select that and then push the button in the edit window, it lets you pick a file for a background. I guess I’ll have to go reconfigure everything now that I know that.
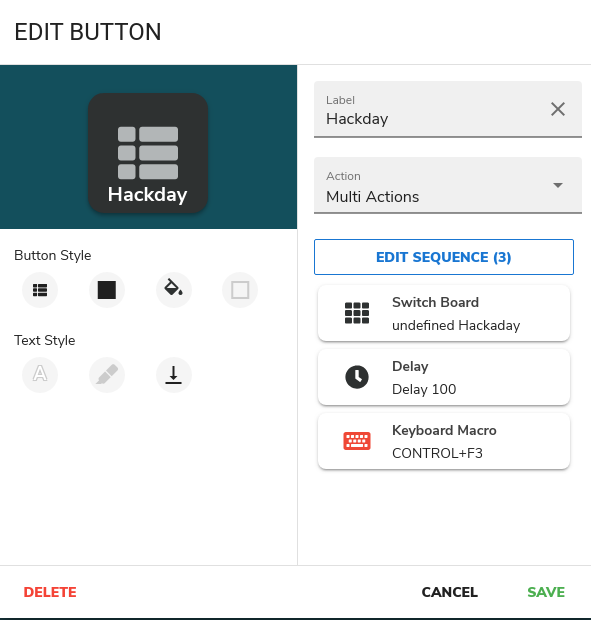
One thing that is nice is that you can have a button do multiple actions. So, for example, when I press the Hackaday button, it not only switches to the Hackaday page on the deck, it also flips over to my Hackaday desktop on the PC by sending a keyboard command. It could also run a script or folder, too.
Buttons can run more than one action
It isn’t quite a scripting language, but it prevents you from having to tie buttons to a bash script in some cases.
The Final Piece
I mentioned that I didn’t appreciate that loading the program on startup also causes the main window to appear. I found a fairly simple way to combat that, at least on KDE. First, run the program minimized. You can do that a few ways. I used a KWIN window rule to force it to iconify, but you could also use kstart to do that. Of course, if you aren’t using KDE, you’ll have to find another way to do it and, honestly, it doesn’t really matter if you don’t mind seeing the config screen pop up for a bit on startup. That’s because in addition to setting the program to autostart, I also started a script file called deckboard-tidy.sh:
#!/bin/bash
sleep 5
wmctrl -c deckboard
In other words, wait for the program to start and then close its window. It still stays running in the systemtray. You could also tell Deckboard not to load itself and then do the whole loading operation in this script. You can probably pull the same stunt on other desktops, but the details will depend on your setup.
Honestly, this is a hack that is more useful than it is difficult. But you can spend a lot of time tweaking that perfect setup. But it makes that old phone something you can use every day.
If you prefer a more rigorous hack, check out FreeDeck. Not that that’s the only one out there. If you want a really useful hack, it would be nice to reverse engineer Deckboard’s TCP protocol so we could have a Raspberry Pi server for this.
The main problem with using an iPhone as a 3D scanner in this manner is that the sensor is built into the front side of the device. It’s great for scanning your own face, but if you’re trying to scan an object, you can no longer see the iPhone’s screen. [Scott] solved this problem by slapping together a handheld 3D printed device to hold the iPhone along with an external monitor. This allowed Scott to scan while still seeing what was going on.
Having noticed that some of the 3D scanning apps produced strange, glitchy results when scanning faces, [Scott] decided to innovate artistically. He employed [Andrea] to model, took some scans, and Photoshopped the results into some impressive posters.
Overall, [Scott] demonstrates that it’s relatively easy to repurposed the iPhone for improved 3D scanning. With a simple design, he has a handheld scanner that works way better than just the phone on its own. Alternatively, consider getting into photogrammetry instead.
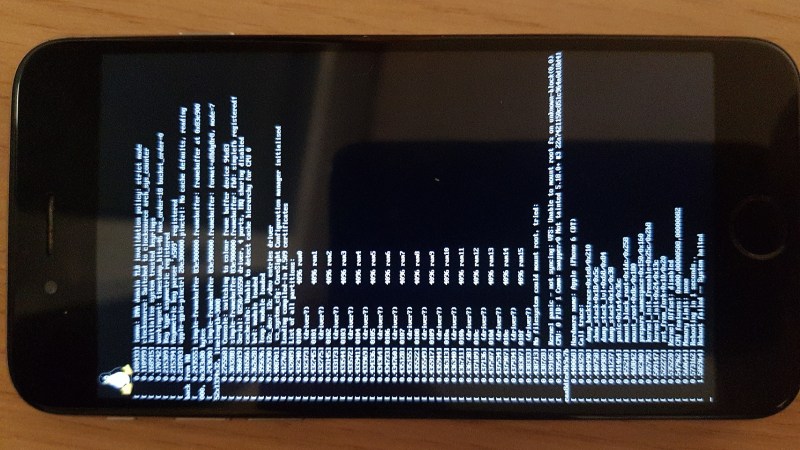
[Konrad Dybcio] tells about his journey booting Linux on A7/8/8X processors, playing around with an old iPhone 5 he’s got in a drawer. It’s been a two-year “revisit every now and then” journey, motivationally fueled by the things like Linux on M1 Macs announcement. In the end, what we have here is a way to boot mainline Linux on a few less-than-modern but still very usable iPhones, and a fun story about getting there.
[Konrad]’s work is based on the Sandcastle project research, but he couldn’t quite figure out how to make their code work, and had to make sense of it as he went. At some point, he got stuck on enabling the MMU, which was the main roadblock for a while. Joined by another developer intrigued by Apple hardware, they were hacking away at it, developing tools and neat tricks on their way, but to no avail. With the framebuffer accessible and no other decent debugging methods in sight, he tells about a code snippet they wrote that printed register values as valid barcodes
Then, looking deeper into the known-working code, he realized that there was a single line difference in how they loaded the Linux image. Fixing that, they got the MMU to enable! From here, the Linux hacking part ensued, and still continues, with other people pulling their old iDevices out of their respective drawers and joining in on the fun. Integration work is ongoing, with basic peripherals being brought up. Some of the peripherals, we might not see working anytime soon, but from here, it should be way easier to develop drivers and conquer these devices one-by-one.
This development should work for iPhone 5S, 6 and 6 Plus, iPod touch 6th gen, as well as iPad Air 1/2 and iPad Mini 2/3/4. Would you like to boot Linux on one of these devices in your posession? [Konrad] shares instructions on how to get your device from zero to a Linux bootlog on the screen; assistance is available but Linux experience is desired! If you do decide to play around with your own old iDevice, you should spend a minute or two helping him along the way – he is collecting ADT files from different iDevices, and instructions for providing one are super simple!
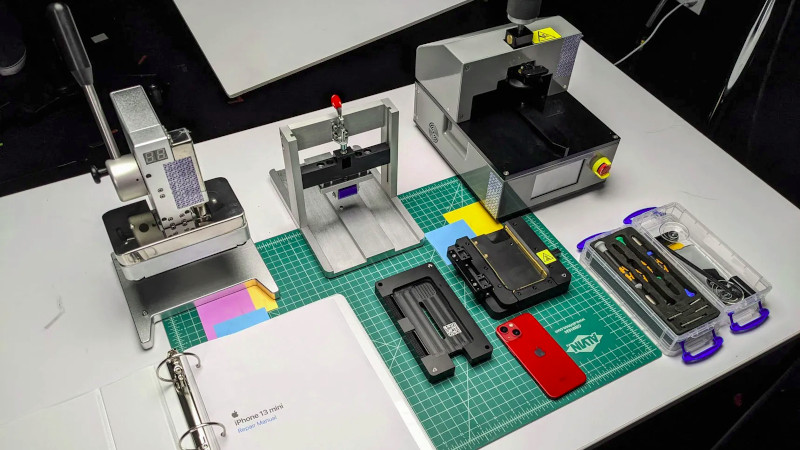
It’s been a frequent criticism of Apple, that their products are difficult to repair. They’ve hit back with a self-repair program for iPhones, and should you wish to take advantage of it they will hire you a tool kit. Not the iFixit box you might expect, instead they give you two hefty suitcases that contain 36 Kg of tools and equipment. Yes, you can repair an iPhone, but they ensure that it’s not for the faint-hearted.
In the kit is an impressive array of everything you might need for your iDevice, including the proper heat plate and press for the job. None of that messing about with a hot air gun for your $49 rental cost and $1200 if you don’t return the tools, but it remains an impossibly difficult and expensive process for all but the most dedicated of Apple fanboy technicians.
The sense from the Verge article is that Apple have had their arm twisted to the extent that they must provide a repair option, but they’ve gone to extravagant lengths to make it something nobody in their right mind would pursue. There’s an attraction in the idea of playing with a fully-equipped Apple repair kit for a few days, but maybe it’s not worth the cost.

 What people commonly encounter is that charging speed depends on the charger involved, but even one hundred chargers in parallel won’t speed up this iPhone’s charging rate, so what’s up? First off, the phone’s charger chip and the battery’s BMS will both limit charging current, so for experiment purposes, those had to be bypassed. First attempt was using a hefty DC power supply with the original cell, and, unsatisfied with the lack of fire and still relatively slow charging, [Scotty] decides to up the ante.
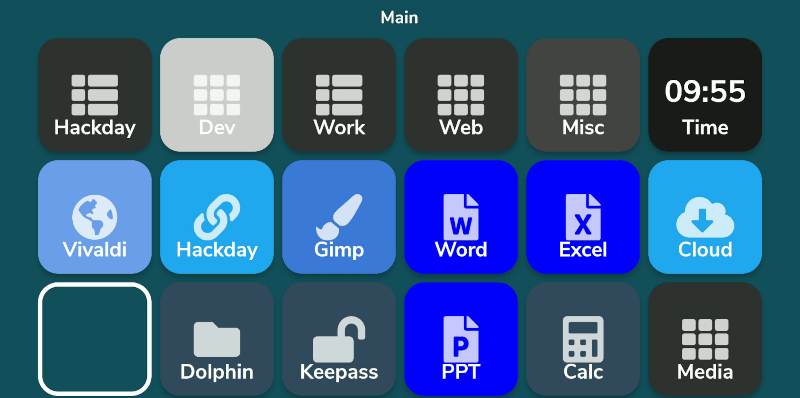


 (@konradybcio)